If you’re new to payroll, or new to Staffology, you’ve come to the right place. Our quick ‘Get started with Staffology’ guide will have you up and running payroll in no time. And, if you need some time to think, our free trial means that you can explore Staffology in full, with no restrictions on what you can access.
So, what’s the best way to get started with Staffology?
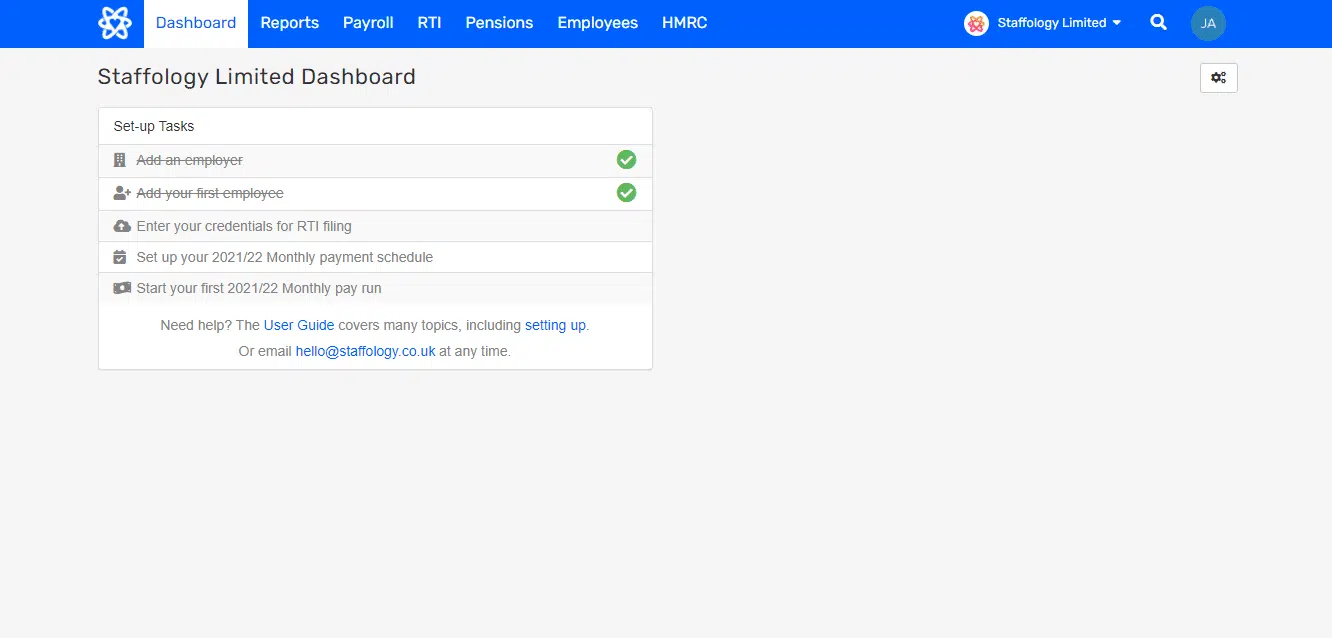
First things first, make sure you’re on the dashboard
If you’re already using the demo employer to have a look around, then this guide will help you to create your own employer, and add your details of employees, connect with HMRC and set up so you’re ready to run payroll!
The steps to success with Staffology
Staffology Payroll has five steps to success:
Complete your employer details
Add all employees
Enter your credentials for RTI filing
Set up your payment schedule
Start your first pay run
Let’s go over how to do each of these steps!
Complete your employer details
When you created your account, we used the Companies House government lookup, to find publicly available basic details, including your company number and more. Once this is in, all you need to do, is complete your remaining details.
There’s six tabs under the employer that need filling in; HMRC, Bank Account, Default Pay Options, Pension, RTI and Leave.
Whether you’ve got four or forty employees, they’ll need to be added correctly before you can start to pay them. If you’ve got an existing CSV with employees in, or a HR software, then you can import from there.
Otherwise, you’ll need to add them manually, following the steps below.
RTI (Real Time Information) is the HMRC way of connecting to your payroll. It allows you to automatically file any payroll information each month, saving manual reporting. Staffology is HMRC approved and links up with the government to make filing easy.
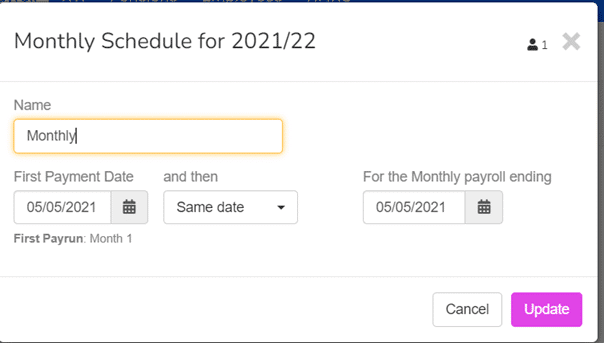
Before you can pay anyone, make sure that your pay schedule is set. This will aid any automation you set up later on as our system will know when to trigger a pay run.
Payment schedule is set at employee level and to do this step, you will have needed to have added at least one employee. By default, Staffology sets any employees to monthly, but you have the freedom to choose from multiple options, including weekly, as well as the ability to create your own pay schedule.
To set your payment schedule, follow the steps below:
1. Head to the Payroll tab.
2. Press the “Set Schedule” button.
3. A pop up like the one below will appear. As our demo employee has their pay monthly, this example will show monthly pay schedules.
4. First, choose a name for this pay schedule that is representative of what you need, whether that’s Monthly, Weekly or similar. Ours is Monthly.
5. Then, set your first payment date for the pay period. First payment date refers to the date employees are paid.
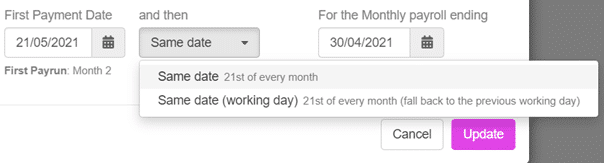
6. Once you’ve set the first payment date, move onto the ‘And Then’ field, selecting the option of when you want your pay run to happen, whether it’s the same date every pay schedule regardless of whether it’s a weekend, or the working day beforehand. This field only applies to monthly pay schedules.
7. Finally, set the end date of your pay schedule. We recommend setting this as a date at which your payroll ends or needs reviewing, once you’ve set this up, this is how long your pay schedule will run for.
8. Then, press update. You will have one final chance to amend this within the software, however, if you require support later down the line, our support team is always here to assist.
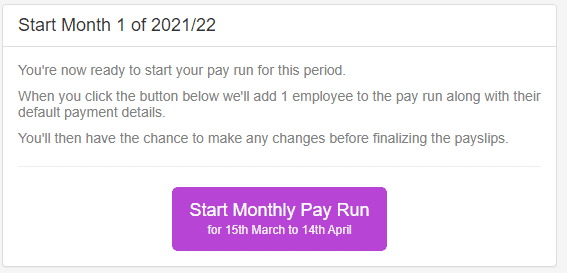
9. That’s it! You can now begin your first pay run.
Start your pay run!
Once all this information is added, you can send your first pay run out! A screen like this example below will appear.
And you’ll be able to amend any pay information before finalising your pay.
Learn more on how to send a pay run using the video below.